Category Programming

Installing NativeScript on Mac

There’s nothing quite like grappling with the installation of a development environment, there is no greater joy than getting bogged down before you’ve even written a single line of code. Today I installed NativeScript on Mac (El Capitain) and these are some of the problems I encountered.

The instructions on the NativeScript Advanced Setup for OSX seem straight forward enough, so lets give it a go:

brew install homebrew/versions/node4-lts

And before I even get off the starting blocks I’m in error country:

Error: undefined method `desc' for Node4Lts:Class

OK, maybe my brew is out of date since I don’t really use it, so I’ll try this:

brew update

Which resulted in this:

warning: unable to unlink .yardopts: Permission denied
warning: unable to unlink CONTRIBUTING.md: Permission denied
warning: unable to unlink SUPPORTERS.md: Permission denied
fatal: cannot create directory at '.github': Permission denied
Error: Failure while executing: git pull -q origin refs/heads/master:refs/remotes/origin/master

Which means maybe I have an permissions problem, and you generally don’t use sudo with brew so I do this:

sudo chown -R $(whoami):admin /usr/local
cd /usr/local && git fetch && git reset --hard origin/master

And finally I try this again:

brew update

Success!

So now I can finally install Node (I’m not cool enough to already have it installed):

brew install homebrew/versions/node4-lts

Success! Things are going quite well and the rest of the steps go smoothly (I didn’t bother with the Android steps) except for the thing I actually need:

npm i -g nativescript

More permission errors:

npm ERR! Error: EACCES, mkdir '~/.npm/through2/0.2.3'

So, lets chown everything in my home npm directory:

sudo chown -R $(whoami):admin ~/.npm

And try it again:

npm i -g nativescript

Success! Now I can start dealing with real problems.

Excel on Steroids: Google Docs and App Script

A post today by my friend Thomas about normalising the county portion of Irish address prompted me to write a little bit about a recent geo-coding problem I had. I was working on archiving the data from Edinburgh is Everywhere and wanted to get the city and country of the lat-long coordinates that the user pin-dropped.

I evaluated a few different options, Python being my first choice, but some off-hand comment on a blog lead me to investigate Google Docs instead.  I had used Google Sheets, their Excel equivalent, but it was so long ago that there wasn’t much to it back then. Sometime between now and then Google released App Script, a cloud-based Javascript environment for automating Google Docs and other Google products such as Gmail and Google Drive. The magic is that you can use JavaScript to create functions that you can then use in formulas in Sheets. I’m really impressed with the level of integration and customisation that App Script allows for these products, it beats Visual Basic or Applications any day of the week.

I had rolled up my sleeves and started to inspect Google’s reverse geocoding example when I found this excellent post on converting coordinates to addresses with the Google Maps API, and within a few minutes I was sorted.

Animatronics for Leaving Cert Technology

This year the project for Leaving Cert Technology is Animatronics. As part of our Technology Day initiative at the Limerick Institute of Technology I did a workshop on Animatronics using Genie Boards and Servo Motors, specifically the Genie E18 Motor Board. You can download my Animatronics Presentation Slides as a PDF. Feel free to use it in your classrooms. If you have any questions, just ask.

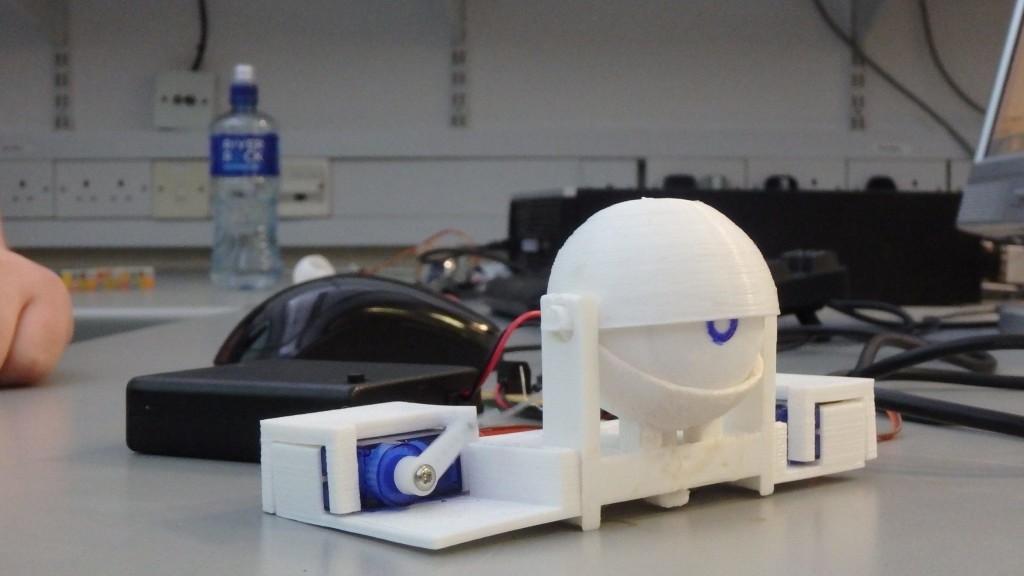
Animatronic Eyeball
Animatronic Eyeball I created for Technology Day, photo courtesy of Alan Kavanagh

In order to demonstrate animatronic principles to the students I 3D printed an Animatronic Eye Ball by sideburn on Thingiverse on my Prusa i3, you can see a version of it in action here:

The Genie Board E18 Motor Kit only has 3 outputs dedicated to driving Servos (the E18 chip itself can drive 8 servos) so I only printed one eye-ball. It was a difficult enough print, it showed that I needed to further calibrate my printer and that the filament I was using was substandard. There was a nice bit of sanding required to get the action running smoothly and there was a small amount of strain in the eyeball mechanism that kept it popping apart so I put two screws through the bottom of it and that seemed to steady it up.

To show off the Visual Programming Language of the Genie Board I created an animation loop for the left-right motion of the eyeballs and I hooked the eyelid up to an LDR, it worked really well. The Genie Boards ability to run multiple flowcharts at the same time meant it was very easy to operate the animation loop and the sensor input independently.

This was my first time using the Genie Boards and they are an impressive and inexpensive little package. They are based on PIC micro-controllers but use a completely custom and reasonably friendly (unfortunately Windows only) interface. I’m looking forward to putting together something for next years project. There seems to be very little resources out there on these Genie Boards and I’m contemplating putting together a series of YouTube videos in the near future.

iOS 8 Directory Structure and In-App Purchase Downloads Problems

With iOS 8, every new build of your application will most likely be stored in a different container. This means that any file system paths you store to downloads or documents may change between builds.

While debugging some In-App purchase code I came across the following problem. I would start an In-App purchase with Apple hosted downloads, then just before the download completed, I stopped the App using Xcode. When I rebuild and run the app, the download would complete as normal and the download state was set to SKDownloadStateFinished. All good, with one exception: the path that download.contentURL contains, is pointing to a different app container, the original container from the previous build. A container that we don’t have access to, which will cause our move operation to fail!

This is one of those bugs that you’re probably not going to come across very often, but when you do it’ll eat up just enough of your time to annoy you! I’m assuming that the same error could occur if the user kills the app, updates it from the App Store, and then restarts. Now, off to file a radar…

Remember to fill in “What to test?” on new Testflight builds!

If you upload a new prerelease build to Testflight iOS 8, you need to fill in the “What to test?” textbox under “Testflight Beta Information” before your build will be released. It’s obvious the first time, but not for updated builds. There’s no indication that you need to fill this out for the build to go live, even if it’s something you should do it’s something you might miss.

Beware unofficial sync cables

My 4S is my daily phone and I use it for development too. When I got my new MacBook Air however, it wasn’t connecting properly. It connected and disconnected rapidly, vibrating each time, iTunes throwing up 50 messages saying the device was no longer available, Xcode the same. This was frustrating, my 2008 Macbook still worked with the 4S, but the new MacBook choked on it.

I bought a load of cables, none of them official Apple cables, none of them worked. They weren’t all cheap either. They’d charge from the power adapter but nothing more. In frustration today, after months of this crap, I decided to pay €20 for an official Apple 30-pin to USB Cable.

It works, flawlessly. Lesson learned Apple.

Solving problems with Automator

I regularly get asked ‘tough’ computer questions. Today a colleague had 3 folders, each with 100 70MB TIFF files, that he wanted to use as a PowerPoint presentation. My office PC (Windows XP, 1GB of RAM, I know, I need to ask for an upgrade!) was ill equipped to deal with the issue and even if it was speedier, I wouldn’t have had anything other than the basic Windows+Office+Visual Studio install.

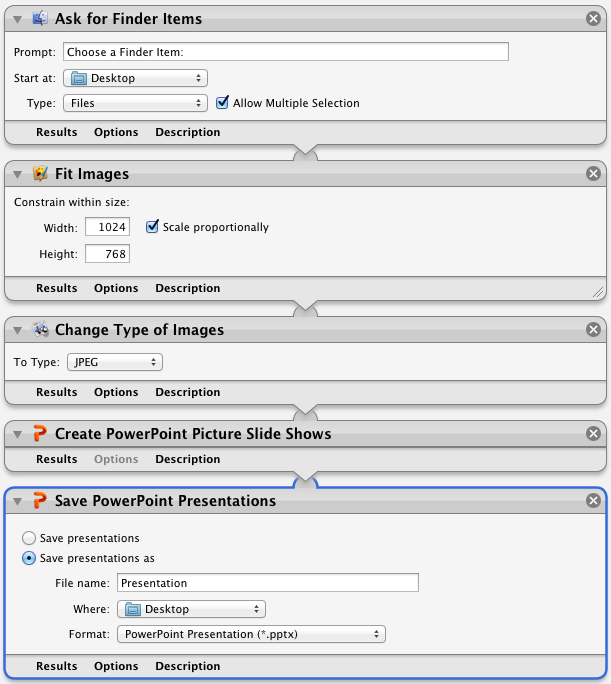
I initially tried to import the images into PowerPoint as a photo album but that didn’t seem to work as it kept the gigantic resolution and file size of the TIFFs. I had my Macbook with me so I decided to see if automator could be used to complete the necessary tasks.

Automator is a secret weapon that’s installed on everyone’s Mac. It allows you to automate various tasks, move files, take screenshots, convert file formats and access functions from installed software, in this case PowerPoint and Pixelmator.

I hope to see the Automator interface used some day to allow more advanced control over the iPhone and its settings, I think it would serve perfectly as the iPhone equivalent of Android’s Tasker.

The tasks I needed to complete in order were:

  1. Resize the images to a more respectable resolution
  2. Convert the images to the JPEG file format
  3. Insert each image into a PowerPoint presentation

It took me only a few minutes to put together the workflow and the results were perfect.