Blog

Installing NativeScript on Mac

There’s nothing quite like grappling with the installation of a development environment, there is no greater joy than getting bogged down before you’ve even written a single line of code. Today I installed NativeScript on Mac (El Capitain) and these are some of the problems I encountered.

The instructions on the NativeScript Advanced Setup for OSX seem straight forward enough, so lets give it a go:

brew install homebrew/versions/node4-lts

And before I even get off the starting blocks I’m in error country:

Error: undefined method `desc' for Node4Lts:Class

OK, maybe my brew is out of date since I don’t really use it, so I’ll try this:

brew update

Which resulted in this:

warning: unable to unlink .yardopts: Permission denied
warning: unable to unlink CONTRIBUTING.md: Permission denied
warning: unable to unlink SUPPORTERS.md: Permission denied
fatal: cannot create directory at '.github': Permission denied
Error: Failure while executing: git pull -q origin refs/heads/master:refs/remotes/origin/master

Which means maybe I have an permissions problem, and you generally don’t use sudo with brew so I do this:

sudo chown -R $(whoami):admin /usr/local
cd /usr/local && git fetch && git reset --hard origin/master

And finally I try this again:

brew update

Success!

So now I can finally install Node (I’m not cool enough to already have it installed):

brew install homebrew/versions/node4-lts

Success! Things are going quite well and the rest of the steps go smoothly (I didn’t bother with the Android steps) except for the thing I actually need:

npm i -g nativescript

More permission errors:

npm ERR! Error: EACCES, mkdir '~/.npm/through2/0.2.3'

So, lets chown everything in my home npm directory:

sudo chown -R $(whoami):admin ~/.npm

And try it again:

npm i -g nativescript

Success! Now I can start dealing with real problems.

My Screencasting Setup

For the last year I’ve been recording screencasts to augment my teaching of programming. Student feedback on the videos has been great, they are more likely to watch these videos than go to the notes. A quick look at my course reports and YouTube analytics tells me that every student has watched the videos, but not every student has read (or at least loaded) the notes.

I use a Macbook Air (2013) for recording all of my screencasts, but the software that I use is also available for Windows. The only Mac Specific software products that I use are Keynote and Preview for presentations and documents and Parallels Desktop for running Windows on the Mac, but depending on your requirements you may not need these.

Two of the main reasons that I record videos on the Mac are Full Screen mode for apps and the Preview app. If I need to reference onine documentation or a PDF I can have it opened full screen in Preview and simply swipe to change to it. This means that I don’t have to mess around with minimising windows and the transition is almost instant. I can be working through a problem, swipe over to the documentation to discuss it and then swipe back to continue exactly where I left off.

Software Overview

Camtasia by Techsmith

Camtasia is used to record the screen on your computer, its available for both Mac and PC but the features vary slightly between platforms so if you have access to both Windows and Mac make sure to compare them before you take the plunge. I use the Mac version exclusively because Windows (not Camtasia, just Windows) has a habit of force rebooting to installing updates when I’m in the middle of recording a video.

The editor is very easy to use and doesn’t provide a huge amount of options, if you have more advanced video editing requirements you might need a separate editor. You can record the entire screen or just part of it and you can choose the audio source before you record a clip. You can add a variety of effects (fade in, fade out, spotlight, blur), labels, annotations and transitions.

Camtasia can export your video to a file or it will upload your finished work directly to a number of video sharing websites like YouTube and Google Drive.

Parallels Desktop

When I do record Windows, I do it within a Parallels Desktop Virtual Machine on the Mac. I use a Mac for my day to day computing and only use Windows at work, so when I want to record Windows this is the best solution. You’ll need a powerful enough computer to run Parallels and record the screen at the same time, especially if the software you’re using in Windows is resource intensive.

Preview

I use this for showing PDFs and other documentation that I’d like to show on screen. Preview works in Fullscreen mode which means that nothing is visible except for the document itself. On Mac you can swipe between fullscreen applications easily and it makes it a lot easier to show these documents instead of doing it on Windows.

Keynote

Keynote is Apple’s competitor to Powerpoint, even though Powerpoint is available on Mac I prefer the animations and ease of use of Keynote. I’ll often use Keynote just to display an introduction or an overview before I get to the demos.

Microphones

If you plan on typing and using the trackpad on your computer while recording your screencast you’ll have to invest in an external microphone, otherwise your audio will be filled with loud taps, clicks and hand movements. A headset mic like those you use for Skype or for dictation are perfectly usable but the audio quality may not be to your liking. You’ll end up listening to yourself a lot when you’re editing your videos.

RODE NT-USB

I originally got the RODE NT-USB microphone for recording music but I decided to try it for my screencasts and I’m impressed. It plugs directly into the USB port on your computer and contains its own sound card, so no matter what calibre your computer, the audio will sound great. I’m not going to recommend that you buy this mic up front, technically any mic will do to get started so once you’re sure you’re going to make use of a better mic it’s worth the investment. It also works with the iPad (if you have the camera adapter kit) so you can easily go mobile for recording if you wish. I plan on doing a writeup on microphones for screencasting in the near future as I have access to a lot of different options for testing.

Workflow

Recording

A typical screencast that I record features me using Visual Studio (the programming environment that we use, not screencasting software) in Windows and narrating my actions. I prefer to record both video and audio at once, but Camtasia easily allows you to record video and then record a voiceover separately. I’ll often use Keynote to do an intro or a small slideshow at the start of the video. I’ll usually record this part separately and then do further recordings for each specific example, I’ll use fade in/out transitions to mark the sections when editing.

I’ll generally rehearse the demo through a few times before recording but I don’t read from a script.

A Note About Accessibility

In education we often have to think about accessibility and we need to keep in mind that students may be hard of hearing etc. YouTube will automatically generate closed captions for your videos if you speak slowly and clearly. You can edit the transcript afterwards to clean up any mistakes that YouTube has made. Don’t worry about speaking too slowly in the video because most modern video hosting sites will allow the user to adjust the playback speed.

Editing

It’s hard not to be a perfectionist when you’re editing. It can be tempting to obsess over every umm and ah in your speech, every mis-click or typo that you make but I often leave them in as long as they’re not going to be potentially confusing for the person watching the video. Camtasia’s timeline editor is very easy to use and mostly it’s just snapping the videos to each other. It’s easy enough to cut out segments or to rearrange the ordering.

When editing the audio a good rule of thumb is to set your computer volume to 50% and make sure you can comfortably hear the audio in your video while sitting at your computer.

Publishing

I use YouTube with unlisted videos for my video hosting. It’s free, I can upload long videos (you may have to verify your account with Google first), you get free captioning, free analytics, and you can easily embed the video in Moodle or any other VLE. Unlisted videos don’t show up in YouTube’s search but they’re accessible to anyone who has the URL.

Another option is Vimeo Pro which also allows you to lock videos to a certain domain, this would ensure that people couldn’t see your screencasts unless they were watching from inside your VLE.


So that’s my setup and workflow at the moment, I’ll write a new post any time I update my process or discover something worth sharing. I plan on incorporating real-life video from a video camera soon so I’ll write that up when I’ve a process in place. If you’ve any questions, feel free to contact me.

Excel on Steroids: Google Docs and App Script

A post today by my friend Thomas about normalising the county portion of Irish address prompted me to write a little bit about a recent geo-coding problem I had. I was working on archiving the data from Edinburgh is Everywhere and wanted to get the city and country of the lat-long coordinates that the user pin-dropped.

I evaluated a few different options, Python being my first choice, but some off-hand comment on a blog lead me to investigate Google Docs instead.  I had used Google Sheets, their Excel equivalent, but it was so long ago that there wasn’t much to it back then. Sometime between now and then Google released App Script, a cloud-based Javascript environment for automating Google Docs and other Google products such as Gmail and Google Drive. The magic is that you can use JavaScript to create functions that you can then use in formulas in Sheets. I’m really impressed with the level of integration and customisation that App Script allows for these products, it beats Visual Basic or Applications any day of the week.

I had rolled up my sleeves and started to inspect Google’s reverse geocoding example when I found this excellent post on converting coordinates to addresses with the Google Maps API, and within a few minutes I was sorted.

Challenges for the New Year 2016

I’m not one for resolutions, but I do enjoy a good challenge. In order to shake things up I’ve decided on two particular challenges for the start of the year, I’ll no doubt add more afterwards.

Reducing Zombie Social News Consumption

I’ve decided that I waste too much time on certain websites, reddit and Hacker News being the two main culprits, and that I’m going to replace the time that I spend on them with something else. In this case I’ve decided to take up reading the New York Times when I have an idle moment on my phone instead of automatically opening a reddit app and mindlessly scrolling through page after page of distraction. That’s not to say that these sites don’t have value, they do, but I think that I long ago hit the point of diminishing returns.

Why not the Irish Times? Well, it’s an election year in the US and there’ll be plenty to watch as it plays out, the times is hardly unbiased but it is still the paper of record and I find that I end up reading a lot of NYT articles from the above social news sites. In addition, The New York Times Web and Smartphone subscription are cheaper due to their academic subscription discount which is a plus.

80 Books in 80 Days

I recently purchased a complete set of Penguin’s Little Black Classics in an effort to broaden my reading a bit, I’ve been mostly reading biographies lately and it’s getting a bit stale. Each of these books is short, about 50-60 pages in total, some are complete works: short stories and poetry and some are extracts from larger works. I plan to read them in order and to read at least one a day. 80 days from today (which, coincidentally, is April 1st!) I plan on having all 80 of them read, which roughly equates to one 350 page novel a week. I’ll be posting roughly once a week with a summary of the books that I have read.

I’ll be back in a week to post my progress!


Animatronics for Leaving Cert Technology

This year the project for Leaving Cert Technology is Animatronics. As part of our Technology Day initiative at the Limerick Institute of Technology I did a workshop on Animatronics using Genie Boards and Servo Motors, specifically the Genie E18 Motor Board. You can download my Animatronics Presentation Slides as a PDF. Feel free to use it in your classrooms. If you have any questions, just ask.

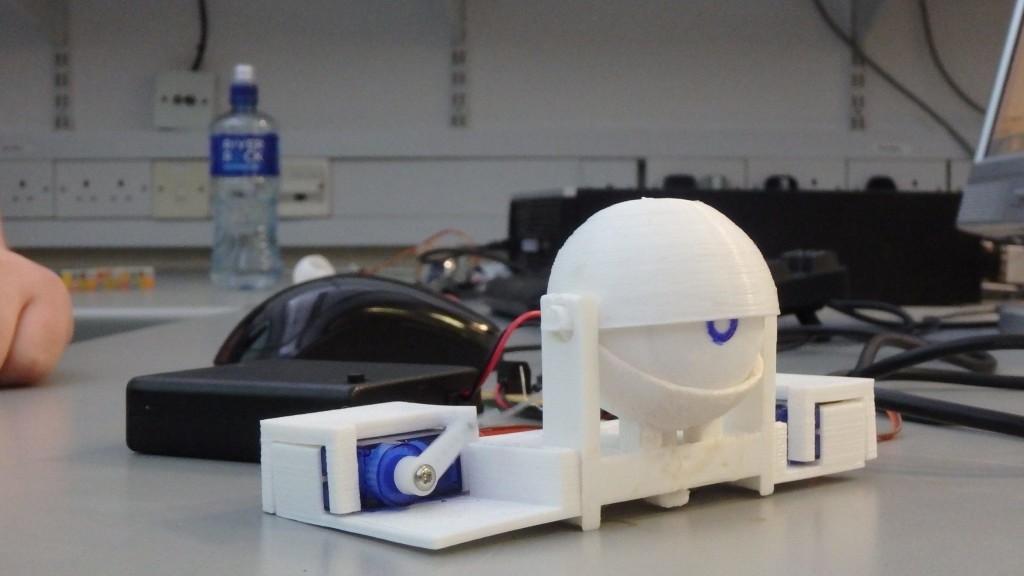
Animatronic Eyeball
Animatronic Eyeball I created for Technology Day, photo courtesy of Alan Kavanagh

In order to demonstrate animatronic principles to the students I 3D printed an Animatronic Eye Ball by sideburn on Thingiverse on my Prusa i3, you can see a version of it in action here:

The Genie Board E18 Motor Kit only has 3 outputs dedicated to driving Servos (the E18 chip itself can drive 8 servos) so I only printed one eye-ball. It was a difficult enough print, it showed that I needed to further calibrate my printer and that the filament I was using was substandard. There was a nice bit of sanding required to get the action running smoothly and there was a small amount of strain in the eyeball mechanism that kept it popping apart so I put two screws through the bottom of it and that seemed to steady it up.

To show off the Visual Programming Language of the Genie Board I created an animation loop for the left-right motion of the eyeballs and I hooked the eyelid up to an LDR, it worked really well. The Genie Boards ability to run multiple flowcharts at the same time meant it was very easy to operate the animation loop and the sensor input independently.

This was my first time using the Genie Boards and they are an impressive and inexpensive little package. They are based on PIC micro-controllers but use a completely custom and reasonably friendly (unfortunately Windows only) interface. I’m looking forward to putting together something for next years project. There seems to be very little resources out there on these Genie Boards and I’m contemplating putting together a series of YouTube videos in the near future.

Limerick Hackathon: Arduino

Some friends of mine have organised a Hackathon at the Fab Lab in Limerick on the 21st of November. The theme for this particular hackathon is Arduino based hardware projects.

If you want to come along you should be able to program a bit and at least have your Arduino IDE set up. Any other equipment that you might be able to bring is a bonus!

Our aim is to create a friendly low-key event with the emphasis on fun.

You can find out more at Limerick Hackathon and you can register for the event here.

iOS 8 Directory Structure and In-App Purchase Downloads Problems

With iOS 8, every new build of your application will most likely be stored in a different container. This means that any file system paths you store to downloads or documents may change between builds.

While debugging some In-App purchase code I came across the following problem. I would start an In-App purchase with Apple hosted downloads, then just before the download completed, I stopped the App using Xcode. When I rebuild and run the app, the download would complete as normal and the download state was set to SKDownloadStateFinished. All good, with one exception: the path that download.contentURL contains, is pointing to a different app container, the original container from the previous build. A container that we don’t have access to, which will cause our move operation to fail!

This is one of those bugs that you’re probably not going to come across very often, but when you do it’ll eat up just enough of your time to annoy you! I’m assuming that the same error could occur if the user kills the app, updates it from the App Store, and then restarts. Now, off to file a radar…